Showing posts with label mac. Show all posts

Monday, March 28, 2011

FOTD

This is a look I came up with tonight because A)I have nowhere to go and B)I was bored. Not having to go anywhere means my makeup has no bounds so I went as far as I wanted to go with it. :)
Not for the faint of heart, this look is brought to you by a girl with pink hair.

Face:
mac-pro longwear foundation
mac-invisible set powder
mac-studio select concealer
mac-studio fix foundation
coastal scents- contour/blush palette

Cheeks:
mac-azalea blush
mac-silver dusk powder
mac-kitchamas pigment
coastal scents- contour/blush palette

Eyes:
mac-french quarter greasepaint stick
nyx-cottage cheese pencil
mac-later pigment
mac-softwash grey pigment
sugarpill-poison plum
mac-pure white pigment
mufe-301 star dust
mac-carbon
mac-graphblack technakohl liner
mac-quite natural paint pot in brows
mac lashes

Lips:
occ- hush lip tar
occ- hoochie lip tar
mac-creme de cup lipstick
mac- if its pink dazzle glass

Wednesday, March 23, 2011

Highlight Baby.

Hello Loves!
I've come to tell you of the wondrous tales of highlighting your skin. No, I don't mean the fluorescent yellow or neon pink kind!

high·light (līt′)
noun
1. To make prominent; emphasize.

-

 One of my all time favourite makeup steps is highlighting. It's so simple and quick and gives a lot of dimension to your face. Highlighting is basically playing light tricks with your skin. There are tons of different kinds of highlighters; powder, liquid, gel, and cream. They all tend to be light tones, more often then not a champagne colour, and vary in different degrees of iridescent particles. (shimmer.) It's these particles that reflect light and cause the area you place them on to become more prominent.

Here’s a picture of my all time favourite kind of highlighter, MAC's Mineralize Skinfinish's. They sell 2 permanently, but constantly have different ones that are limited edition in collections that they release.


They all have veining throughout them, most are one solid colour with varying veining of lighter or darker versions of the same shade:


Or some are 3 or more bars of colour.:


A lot of MAC's skinfinishes have colour to them so you can use them as blush or to enhance your blush as well as to highlight. The ones with different bars of colour are meant to be used as individual colours, or all together in one sweep. There are certain colours that you don't want to use in certain areas..for instance, a pink or coral based highlighter will look fabulous as a cheek highlight, but will not look so hot as a brow highlight. Pink right under your eyebrows is a no go. Unless you wanna hit the fashion runways. Start with a champagne coloured highlight because that is universally flattering on all highlight areas. Then, once you feel confident in playing with different shades, invest in one with lots of bars of colour!

To apply a highlighter you want to use a medium sized fluffy brush for big areas, and a small fluffy brush for small areas.

Areas to highlight:

1.Cheekbones.
2.Bridge of nose.
3.Decolletage.
4.Brow Bone/Tear duct
5.Collarbones.
6.Shins.
7.Cupids bow

Cheekbones- Applying highlight to the tops of your cheekbones all the way to the hairline will make your cheekbones appear longer, thinner and more prominent, therefore also making your face look thinner.

Bridge of nose-Will bring light to the top of your nose, stay away from the tip, makes your nose look straighter and smaller/thinner.

Décolletage- Just the top of your cleavage, it will make them appear bigger and plumper..always a favourite highlight spot of mine ;)

Browbone/Tear duct-This you probably do anyways when you do your eye makeup. No one should leave their house without highlighting their brow bones and tear ducts(not IN your tear duct, just in that area beside your nose.) Even if you don't wear any other makeup, this will bring light to those areas and make your eyes look bigger and make you look more awake.

Collarbones- This will make your collarbones stand out which is just sexy in general. Makes your chest look very sculpted and feminine.

Shins- Clearly this is a summer thing, but running some highlighter down the front of your shins will make your legs appear longer and even bronzy/sexy for those summer dresses.

Cupids Bow- This is that area on the very top of your lips where they make that bow shape. Directly under your nose. Put a tiny bit of highlight in that little pocket and your lips will look bigger and plumper.

One quick tip about applying blush/bronzer/highlight to your cheeks. You NEVER want to put anything shiny under your eyes. It will look terrible and ridiculous. To find the proper area to place colour on your cheeks, take your index finger and middle finger together, place them vertically beside your nose. You do not want any colour in the area that your fingers cover. Now take your index finger and place it horizontally under your eye, right under your lower lash line. You do not want any colour or shimmer there either. Remember how I said putting shimmer on an area brings attention to it? You do not want any attention given to your under eye area. I promise. Also that shimmer will enhance the wrinkles and dark circles you have there.

That being said, go and highlight! You will love the definition and dimension it will bring to your face, especially when you combine it with contouring which I will talk to you about soon!

If you have any requests or questions leave them in the comments! Don't forget to share this blog with your friends!

<3

Friday, March 11, 2011

Estee Lauder Warehouse Sale

Today I got to go to the Estee Lauder Warehouse Sale in Markham.
Estee Lauder owns MAC so you can bet I was ALL over getting some discounted MAC products!! The warehouse sales are great to because they sell a lot of limited edition items that are long gone from stores. It runs Friday, Saturday and Sunday. I went on Friday to make sure nothing would be sold out! It opened at 10am and I got there at 8am to wait in line..2 hour wait in the cold! The things I do to look good. There were $4 bargain bins but I waited too long and by the time I got there the line up was way too long. At the end you hand in your ticket and get a free gift, and there is also a $5 grab bag. The proceeds from that go to breast cancer :)

Here's a list of what I got and how much it was :

green gel Cleanser -$12
cleanse off oil -$12
oil control lotion -$12
brunette msf -$15
redhead msf -$15
blonde msf -$15
bronze bronzing powder -$15
3d gold glitter -$15
3d silver glitter -$15
hi def cyan pigment -$15
lazy day lipstick -$10
lavender whip lipstick -$10
goldy rocks dazzleglass -$10
pinkie pencil -$9
float on by eye kohl -$9
rosemary and thyme eyekohl -$9
272 brush -$20
$5 grab bag
I got two of these:
41 lashes
mineralize loose foundation in medium deep
boy bait cremesheen
mineralize all over lotion

free gift-
double pencil sharpener

Came to around $240!

Successful day. Till next time... <3

Tuesday, February 22, 2011

Smokey Eye LOTD

This was done very quickly without too much effort. I was bored and ended up liking the result enough to share!
Eyes:
mac-painterly paint pot
mac-french quarter grease paint stick
mac-dark soul pigment
mac-frozen white pigment
mac-softwash grey pigment
mac-silver fog pigment
mac-pure white pigment
mac-scene eyeshadow
mac-carbon eyeshadow
mac-reflects gold
mac-graphblack technakohl
mac-42 lashes
mac-black black chromaline
mac-quite natural paint pot(brows)
nyx-jumbo pencil in cottage cheese

cheeks:
hot pink from coastal scents blush palette
mac-hush ccb
mac-soft and gentle msf
mac-refined golden bronzer

lips:
mac-show orchid lipstick
mac-pink poodle lipglass


Monday, February 21, 2011

Some Bright Lip Options

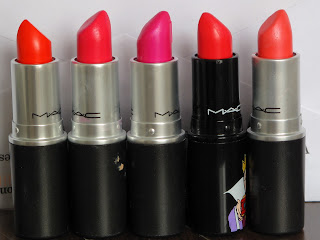
Wanted to share some of my favorite bright lipsticks with you!
These are all from MAC and I can't wait to start rocking these this spring.

From L to R-
Neon Orange (limited edition)
Impassioned
Show Orchid
Toxic Tale (limited edition)
Costa Chic


Kat Von D has a great pink lipstick that I will be picking up soon, its called Backstage Bambi. Bright beautiful pink!


MAC lipsticks are available at any MAC location, they are $17.50

Kat Von D is sold at Sephora and her lipsticks are $21.00

I'll be back with a new post soon with some great eyeshadows to pick up to make sure those eyes pop this spring!

Saturday, February 19, 2011

Spring Makeup Trends 2011

Even though there is still snow swirling around out there, its never too early to start planning and stocking up your spring makeup! This spring there are 4 main makeup trends we are seeing on the runways.

BOLD LIPS!:
Time to shy away from your nudes and neutrals and grab that hot pink lipstick! It's all about bright colorful lips this spring. Hot pinks, oranges, and corals. If you aren't a bright lip person try grabbing your favorite shade and after swiping it on your lips, dab them with a Kleenex. Most of the color will be gone, and you'll just have a bright stain left. Another way to tone down but still be bright is grabbing a nude lip gloss and swiping that on top. My advice: don't be shy!! Grab those hot lipsticks and go to town. (or school, or work, wherever!) Hot pinks and corals are easier to pull off then red lipstick so don't be scared! If you need help finding your shade, go to any MAC counter. The artists there are more then happy to help you try on and find your favorite shade!  Here's some pictures of what we saw on the runway.


BRIGHT EYES!:
This spring has a lot of pastels, and a lot of bright colorful eyes! Clearly this spring is very color orientated.
Whip out those electric blues, bright purples and emerald greens. We saw them being used all over as a wash with some thick black liner, or several bright hues used together. Bright colors don't always = clown makeup. I promise. Just find a shade that makes your eyes pop and swipe that over your lids, line with some black liner and heavy coats of mascara and you are ready to go. Feeling shy? Opt for a neutral lid, and swipe on some colored liner. No one will be able to stop staring at how sexy your eyes look with a teal winged liner. Again, having trouble finding the right shade? Hit that MAC counter and try out colors, ask the artists there to try some on you. Some bright eye looks we saw:


NATURAL MAKEUP!:
This is one makeup trend that never goes out of style. The easiest of all trends, flawless,dewy skin, shimmery cheeks, and nude lips. Swipe on a lot of liner and mascara so your eyes don't disappear. If you are feeling adventurous this is a great look to pair with those fake lashes you never wear.


SMOKEY EYES!:
Last but definitely not least, another never dying makeup trend. The smokey eye. Elusive, seductive and always sexy. Mix it up this spring by straying from the over done silver,grey and black smokey eye. Opt for a color, like navy/steel blue or eggplant. Smoke out the shadow as far up and low as you feel comfortable with, throw on that liner and mascara and march out the door confident in your spring makeup trend knowledge.


Saturday, February 12, 2011

Primers

The basis of primers is simple. As with anything, makeup goes on better when you prime the skin. You need a smooth even base to provide smooth even makeup. Primers even out your skin, and keep oil away from the surface so you have a nice even smooth canvas to place makeup on! Makes sense right? Just imagine rubbing a thin layer of olive oil on your hand, and then trying to put powder eye shadow on top and have it look good. No Buenos.

Eye shadow primers are a MUST. Whenever I work at MAC it’s my favourite thing to show people. The difference in eye shadow on bare skin vs on top of eye shadow primer is astounding. The eye shadow primer should be placed from your lashes alllllll the way up to the brow bone! This makes it smooth, even and keeps oil away. Also, eye shadow primers really help amp up the colour, and keep your eye shadow from creasing for hours upon hours. MAC has a few different eye shadow primers but my favourites by far are the paint pots. They come in little glass jars and is just a cream base. You apply a THIN layer from the lashes to the brow and then simply place shadow on top. Now, paint pots come in several different shades. You can get them in blue, black, silver, gold, brown etc. Or simply get a neutral. I like to use coloured paint pots to help bring out the colour. Like a blue paint pot for blue eye shadows. You can also use more then one at a time! I usually use a neutral paint pot all over, and then the coloured one just on the lid. You aren’t really going to want to put a blue or black paint pot up by your brows ;)
Here is what paint pots look like.


eyeshadow on top of painterly paint pot on the left, bare skin on the right.


Another option I have tried is MAC’s paints. Same premise as the paint pots. Just come in a little tube instead. I only own two, one in red and one in green. I apply these on top of my paint pot but you could just use them alone.

Paints.


If you want to go a non mac option, there is always Urban Decays primer potion. This stuff was ok.. I just find you get a small amount, its pretty expensive and the packaging is god awful. You end up losing a lot of money because eventually the wand wont grab onto the stuff stuck to the sides of the tube.

udpp.


Foundation Primer:

 You need foundation primer in order to have your foundation not sink into little lines and wrinkles or just seep in and disappear. There are two options I’ve had great results with.

One is not sold as a primer but has the same ingredients as smashbox’s foundation primer. This stuff is good!! Lots of professional makeup artists have this in their kit as primer. It’s by the makers of Monistat. (yes ladies I know what you are thinking.) I found it in shoppers drug mart. Its actually a chafing remedy or something. Anyways. Small amount all over face, not eyelids. Let it dry for a min. Foundation on top.
Think its just called chafing relief gel.


The other primer I like a lot is of course by MAC. Its their prep and prime face protect, this stuff rocks cause its spf50. No need to ever apply sun block to your face again! Smooth this all over your face, not eyelids, let it dry then apply foundation on top. This stuff acts like velcro to your foundation. I really like this.


Other things to prime your skin:

MAC- fast response eye cream. :
This is my go to in the mornings when I have to do full makeup and my eyes are all puffy and tired. This has lots of good things in it, one key item being CAFFEINE! YES! Go away puffy eyes and dark circles. This works like a charm. Also is moisturizing and helps those dry under eye areas.
fast response eye cream


MAC- strobe cream:
This is sold in a cream and a liquid. I like the cream cause I have drier skin and this goes on nicely. The liquid is nice because it can be mixed in with your moisturizer or foundation. This is basically a very light moisturizer with slight shimmer in it. It brightens up your skin and makes it look dewy and fresh. This is what those movie stars have on to give them their fresh looking skin. I tell no lies.

strobe cream


MAC- prep and prime skin refined zone treatment:
This you really only need a tiny amount. Spread this on areas where you have large pores. It will make them at the very least so small you barely notice them, at best dissapear completely. I put a small amount of this on my cheeks just under my eyes beside my nose, and on my nose. I get a really big difference with this stuff!


That concludes todays makeup lesson primers. ;)
leave comments and follow! it'll make you cool.

Thursday, February 10, 2011

Porn!

Makeup porn that is. hah! but now you are here so you might as well continue.
This is a post of my vanity/makeup collection. Most of it anyway. I went to staples and got these awesome drawer organizers, 4 of them meaning finally all sections of my vanity look pretty much the same!
I love how it looks, feels more professional.  So behold, makeup porn.
As always you can click on the picture to make it bigger.


full view

first section - nars and benefit blushes, non mac lip stuff, loose pigments and glitters, mac samples of pigments and glitters, mac set powders, paint pots and makeup forever aqua creams.


second section - non mac eye shadows, liquid, gel and powder eyeliners, lash mixing medium, mac large shadows, mac ccbs, foundations, msfn and concealer, mac sample jars of strobe cream, lip conditioner, oil control lotion etc.

third section- chromacakes, paint sticks, non mac primers, UD palettes, kat von d palettes, sugar pill palette and mac palettes, mascaras.


fourth section - sponges, magnet, scissors, tape, sharpeners, eyelash curler, tweezers.

eyeliners, lip liners, greasepaint sticks, paints, nyx pencils, chromalines.

highlighters and bronzers on top, blushes on the bottom.


hand sanitizer, moisturizers, brush cleaner, fast response eye cream, strobe cream, refined skin treatment, fix+, spf50 primer.


mac lipsticks and glosses. (the ones that aren't in various pockets, purses, car doors, and coats!)


Monday, February 7, 2011

Mac Pro Haul

Well.. mini haul. I was downtown so I couldn't resist running into the mac pro store on queen street. For those of you who don't know, MAC has two kinds of stores. Regular and Pro. The pro stores sell a lot more stuff and offer colors and products that the regular stores don't. They are more industry aimed so its really good for professional makeup artists to go there, but anyone can go and buy whatever they want. Anyways. Here's what I got.

Pencil in 'pinkie'. (clearly I grabbed this for the name, but the fact that its neon pink doesn't hurt either)
Chromagraphic pencil in nc15/nw20
Lash mixing medium
Studio fix foundation powder
Lipstick in 'violetta'

These are all only offered at mac pro locations, except for the foundation.

The pencil in Pinkie is a neon electric pink color, and can be used as eyeliner, or lip liner. I've been loving it under my lipsticks.

The chromagraphic pencil is a skin tone color. I picked the lighter of the two they offer because I'm fair skinned. You can use this to line your waterline (it opens up your eyes and finishes off the look, but isn't as harsh as white eyeliner is) Use it as a concealer over blemishes, and my favorite thing to do is outline your lip shape with it. It helps keep the lipstick from feathering and also strengthens your lip shape to make your lips look stronger and more finished. Also when you use this on your cupids bow it really helps make your lips look plump and fuller.

The lash mixing medium is basically a formula in a little tube that you can use to mix with pigments (loose eyeshadow) and glitters and turn them into like a paste. So you can use that as either eyeshadow all over your eye, or as a liner. For example instead of dipping my brush in glitter and patting it onto my eye lid, which would cause the glitter to go EVERYWHERE and only some of it would stay on the lid, you brush this stuff all over your lid first, and then pat the glitter on top of that.. its like a glue that grabs onto the glitter and makes it stay where its supposed to. Also intensifies the color of pigments.

The lipstick in Violetta is one I've lusted after for awhile. Its a deep purple with shimmer. Not for the faint of heart on its own, but you can mix it with other lipsticks and glosses to make it more wearable. I will be wearing it on its own clearly lol.

The foundation isn't anything particularly exciting, just needed to pick it up. Its a powder foundation, great for oily skin, but it tends to go a bit light, I'm a nc15 in liquid foundation but had to pick up a nc20 in this.

Here's a picture of it all, and then some swatches of the liners and lipstick for you.
Any questions ask away!